

![]()
Marking Fabric for Rags/Strips for Weaving
If you don't have a quilter's rotary cutter and mat to cut your fabric strips, try this method. In marking the fabric as a guideline to cutting the strips: Carpenters use a plumb bob with a string and chalk in a container. They use it to mark straight lines on lumber. The string has chalk on it and it is pulled tight, then snapped. This leaves a chalk line on the lumber or in our case, material. Works like a charm.
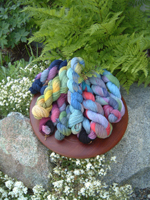
Selecting Colors for Mixed Warp
When selecting multiple colors of yarn to go together in a mixed warp. Put all the yarn in the various colors out on a table for several days and go about your other activities, looking at the yarn as one walks by. Soon you will decide which colors to use and may even change one's mind as to which color combination to use. Often the original yarns you would have thought would go well together actually don't work as well. In a way the yarn colors are talking to you about which ones work well with each other.
Value contrast is at least as important, if not more so, than the actual colors (hues) being used. When colors in the same value (light, medium or dark) range are used... OR the value contrasts deliberately and specifically to complement the structure... then one finds much more harmonious results.
There is an amazing excercise in combining yarns of similar values in a single fabric. Amazing because it seems too simple to be true.
- Get a grey scale from your local art supply place. It's a printed range of grey from 0% (which is white) to 100% (which is black), with each step in between increasing grey by 10%.
- There are round holes in each section. Hold the grey scale in front of your yarn, right up against it. Squint your eyes so tight that you can just barely see. The dot in the grey scale that matches the value of the yarn will seem to disappear. make a note of which % it is.
- Repeat this step with other yarns. After you've got several of the same % value, combine them into a fabric.
You will find that regardless of hue (color) that yarns of the same value can be put together & will make a very pleasing combination. Give it a try - a grey scale will only cost you about a dollar. You will be astounded at the results.
From an old 1960's article in one of those magazines about decorating houses, there was this "Color Theory" article to help one put colors together. Amazing enough, as fiber artists, can learn from these concepts, and apply them toward our own design and color(s) in fiber art.
- No color in nature is uniformly even. Rather it is shaded, containing many shades of the same color.
- There is no color matching. In a green landscape there are thousands of greens. And besides greens, there are thousands of other colors: bark colors, stone colors, soil colors, flower colors, etc.
- Pattern and texture are everywhere in nature. Every leaf is veined, every tree trunk is textured. One must view these up close to see that this is so, as it does not appear from far off.
- There is a certain ratio in nature between shininess and dullness. Most of any natural landscape does not sparkle, glitter or shine. It is matte finish in the main. But there are always tiny flecks of glitter, from the sparkle of dew in the morning to the refracted light bouncing off broadleafed evergreens, the sun backlighting deciduous leaves, and the sparkle of sunlight on lakes, streams, ponds, and oceans.
In weaving you have three elements; color, pattern, and texture. You should never have all three going in one piece of weaving or you have a poorly designed textile.
- Rub your bamboo or wooden needles in a sheet of waxed paper every now and then to make your stitches move more easily across the needles.
- Knitting with a less resilient yarn, like cotton, is more tiring than knitting with one that is springy, like wool. So plan for frequent breaks. Your knitting experience will be more enjoyable, and you will actually achieve more in the end because you won't be knitting with tired hands.
- A small amount of yarn can be made into mini mittens or mini socks. Both make great gifts and fun jewelry.
There are so many different ways for fiber folks to organize there projects. The following are a couple of methods towards organization:
When one purchases new fiber, to keep track of what they have... Make yarn "rolodexes" with binder rings and index cards. Punch a hole in the card for the ring and one for the yarn. Then write info on the card about the yarn, put several strands of the yarn together through the card with a lark's head knot, and put the yarn on the ring in rainbow order. To have separate rings for different types of yarns is helpful too. The ring is handy for hanging them up. Also keep a printed chart of all my sampling results for yarns that you might have a lot of, so you can refer to it quickly.
For a given project, record each step. Place contents into an archival plastic sleeve and place in a notebook for future reference. What kind of contents? Start by taking samples of fiber/yarn and record what it is, cost per lb/skein, and attach a sample of original fiber/yarn. This can be placed on an index card or on the same record that holds the "recipe" for your given project. The "recipe" may be the detailed draft for a weaving project, a pattern to use for a knitted project, or a surface design detail. Once item is woven, knitted, or what-have-you - place a sample of it on this record too. The more details provided - the better the reference will be. You can't have too many details!
The second rod allows you to tie on more easily because the rod is not held tight up against the apron and you aren't trying to tie through little spaces in the apron, so you can tie as often as you need. Also when you are tying on a narrow warp you can easily undo the ends of the rod which are not supporting the warp, which helps prevent the rod from bowing and results in a smile, or frown, depending on how you view it, in your weaving. It is worth the time it takes to put it on, because in the long run it will save you a lot of time.
Frayed threads
- Use beeswax on the area of the thread. Can find in sewing notions at fabric store.
- Use a water-soluble glue stick. Dab on. Let dry. Continue weaving. [quilting stores, fabric stores sell them]
- Use hair spray (but be careful where you spray it)
- Make a thin paste of starch, dab on and let dry.
Broken threads
- Use a 'weavers knot' to secure tying of a new thread to the old broken thread. An overhand knot can be too bulky, and will fall apart from constant abrasion of beater and heddles.
- Be sure to re-thread through heddles or reed, as necessary before securing fixed thread.
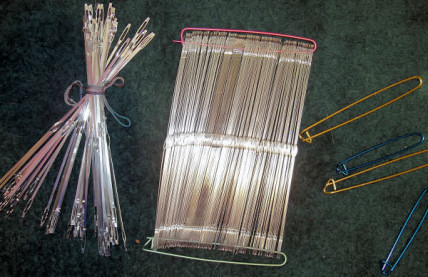
Click to enlarge.When heddles are off the loom, they can be a nightmare if not secured in some way. The picture shows flat metal heddles, but I know that the same method can be used on wire heddles, as well as texsolve heddles. Although the latter having a third stitch holder thru the eye of the heddle is an added advantage. Stitch holders can be found wherever knitting accessories are sold. When dressing the loom, use a head lamp. It is like a miner's lamp or a flashlight that has a soft band that goes around your head with the light sitting on your forehead. It leaves your hands free and directs the light on the threads that you are working on.
![]()
Content copyrighted by Melinda Cornwell
web design © copyright AWSG | PO Box 244055, Anchorage, AK 99524 | Email
website by Conover Designs